Wednesday, March 14, 2012

Sewing Storage Box


 I made this--and wrote the blog post--a while ago! But I've been so busy with school, I'm only just getting around to posting it now.


One of the first things I noticed after getting my sewing machine was how much clutter it added to my life. I’m no stranger to clutter, but that’s exactly why accumulating more is a problem. I decided that since the sewing machine had caused this problem, the sewing machine could fix it.

I want to eventually end up with four things: A large fabric basket for things like packages of batting that don’t have anywhere else to go, a smaller basket to act as a mini trash can so that I can throw scraps of fabric and snippets of thread into it as I go along, a hanging organizer to put on the wall over my sewing desk with spaces for all of my most commonly-used tools, and hanging display for jewelry I’ve made so that I don’t have to sort through a big pile of it when I want to find a specific piece.

I started with the large basket. I searched through tons of tutorials for fabric boxes until I found one that I absolutely loved. It’s by Urban Nest and it can be found here.


I picked out some pretty, sturdy green material from the fabric store that is a temptingly close walk from my apartment, and paired it with some smaller pieces in pinks and purples. I couldn’t find any lightweight cardboard big enough to make the pieces I needed, so I had to use a heavier box. That meant that I couldn’t stitch through the cardboard to secure the top, so I finished it with bias tape instead. The shape of the basket with the cardboard inside meant that stitching a straight line was kind of difficult, so the stitching is very uneven around the top there. I still need to get better at stitching straight lines on things other than just flat pieces of fabric. It obviously looks “beginner-ish” next to the polished look of the original, but I don’t mind too much—I am a beginner, after all! I’m hoping that with everything I learned from this one, I’ll do a much better job on the smaller one. I guess we’ll find out when I make it!


In any case, it’s a fun project with a nice, easy tutorial and the finished product is both attractive and useful. I definitely recommend giving it a shot for anyone looking for extra storage or an enjoyable way to spend some time. J


Monday, January 30, 2012

Taking photos of my dinner is a new experience....

I think my husband has a new favorite meal.


I moved to America from England to be with him. I started making extended trips when I was eighteen—three months was as long as I was allowed—and moved permanently when I was twenty and we got married. I’ve never been into the bright yellow instant-style macaroni and cheese. Just like neon pink strawberry yoghurts and bright orange ice lollies, the American taste for coloring food brightly tends to turn me off (to my sensibilities an orange ice lolly should be the color of orange juice, not orange skin!). I didn’t like the homogenous texture of slippery pasta and slippery sauce.
Then baked mac and cheese hit my radar. Now here was something I was interested in. Made from scratch, with real ingredients and a crunchy top? That sounded fantastic. I had the opportunity to try a few varieties and I enjoyed them.
I decided to try my hand at it myself. I’ve been making basic white sauce (a roux with milk) since I was a child for my family’s lasagna, and a version with cheese in it, and a little mustard powder and a splash of Worcestershire sauce—that would just be getting back to some of the first things I ever learned to cook. I like to mix in bacon or lardons of blanched salt pork for a bit of a salty, tasty bite. I prefer the salt pork, really, because it’s unsmoked. The blanching is important, though. I learned that when I tried a chunk fresh from the frying pan and… the salt level was unpleasant, to say the least.
I’ve made this twice now, and both times I’ve turned around from covering the top with grated cheese and panko breadcrumbs only to find Ben scraping out every last bit of sauce from the sides and bottom of the pan and eating it. It seems he’s a fan.


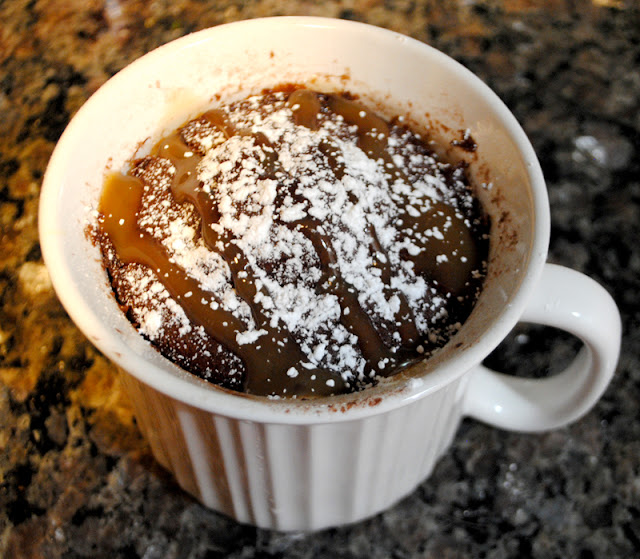
I also enjoyed a treat for myself after he went to bed. I was craving chocolate cake, and I happened to have everything on hand for this awesome five-minute cake in a mug recipe.


 It’s incredible how well it works, and how easy it is. I had mine topped with caramel sauce and powdered sugar with ice cream on the side. It’s a good thing the mug has a lid, though, because this is definitely not a single-serving recipe. I managed about a third of it before I surrendered. I think in future I might try cutting the recipe in half and doing it in a regular-sized mug.


But, in any case, yum. 


Saturday, January 28, 2012

Cushion Covers

My husband and I got a pair of cushions as a gift for our wedding, which was five years ago. They're lovely and soft, but the covers are not removable and over the years have gotten VERY bobbly, which just gives them a kind of tattered look. I decided that my first REALLY practical, usable project should be new covers for these cushions. I wanted to add some stripes in different colors, and I wanted them to go with our brown couch. I don't have a zipper foot for my machine yet--and in any case I don't feel ready to tackle that!--so I knew I wanted it to have an envelope closure. I'd just learned about bias tape, so I figured I'd use that to finish off the visible end of the closure.

I'm quite pleased with how the turned out. I'm still making some mistakes and things aren't always as neat as they could be, but I'm clearly learning and improving with every project I take on.


My husband was really taken with them and insisted on showing them off to his co-workers who have degrees in textiles and so on. I told him that it was kind of like a super-proud parent showing off his five-year-old's scribbles to a professional artist. ;) But it's adorable that he's so excited about my new hobby. Please excuse the slightly dog-haired look of the cushions, though. Since these are for us rather than for a gift or anything else I just tossed them on the couch and my dog Helo decided that he rather liked them as well. There's no amount of lint rolling that can handle a direct hit from Helo!


I'm glad I chose to use the bias tape. Like the rest of the covers it is more practice than professional looking, but the second one looks significantly better than the first, and that's a good sign, right? :D


Friday, January 27, 2012

Early Days

My husband got me my lovely vintage Singer Stylist for Christmas. Because he is AWESOME. We bought it from a lovely couple--I sent the lady a necklace I made that she had admired as a thank you--and it was frustrating to have to leave it almost untouched for two weeks while we went to visit my family in England. When we got back I was still puzzling over the threading diagrams, wondering if I'd ever understand how the thing worked.

Well, I got it. Understanding came pretty quickly. Proficiency will take longer. ;)

The first thing to roll off my machine was a set of placemats for my husband and I. We don't have room for a dining table in our apartment, so we just needed something to line the trays we have since the old mats were looking a little worn. I thought it would be the perfect practice, because it doesn't matter a bit if the stitching was wonky or something went a little wrong. Well, the stitching IS wonky, but I still ended up with two perfectly usable double-sided placemats. :D And a week or two later, I know exactly what I'll do differently next time, too.

An Introduction

So I wanted to start a craft blog. For my crafts. And other people’s crafts, when I really like them. I can’t choose any one particular type to dedicate it to, because I hardly know what I’ll be doing in a week, never mind in a year. I’ve played with drawing and digital art (I’m not very good at these, but I had a webcomic for a while and that was a LOT of fun), painting, clay, cooking and baking, and various fiber arts.


For the last year my main preoccupation has been embroidery. It’s been awesome. I’ve been featured on the Mr X Stitch blog (link) a few times now, and I’ve developed a style that I’m pretty comfortable with. I mostly make jewelry and other small pieces because it allows me to add plenty of richness and detail—I mainly use satin stitch—without spending hours and hours and hours on any one piece. 


If you want to see my embroidery progress from the very first projects I did, my Flickr account has a pretty good record of that.
Expect tutorials for the things I know how to do, learning-as-I-go for the things I don’t, and an awful lot of experimentation.
Um. Hi. I'm Pixie. Welcome to my blog. J